Lots of people are having the same problem with a damn virus. It spreads
via USB memory sticks or external hard drives, and “converts” all the
files into shortcuts. Fortunately the real files are still there, but
you are unable to see them. We will fix the problem in four simple
steps.
PS: Don’t worry if my pictures are in Spanish. I’m gonna explain all the steps in English, and the process is much simpler than it looks.

For that reason, and also to help fighting this memory stick infection, you need to make all files visible. The following steps apply for Windows XP, Vista and 7.

If a healthy USB memory remains clean after plugging it in, this means your computer is clean and you can jump directly to step three.
If a healthy USB stick gets corrupted after being used on your computer, that a sign that the virus is running on your system and your antivirus is not doing it’s job. Use the update function your Antivirus. If the antivirus still fails to catch the infection even after the update, you definitely need to use another product.
Some users are reporting that their current Antivirus brand was unable to detect and eliminate the infection. I like the products from Avira, Kaspersky and Dr.WEB. The first one offers a Free version, the others offer 30 day trials. But please STOP: Before start uninstalling and installing things, follow this whole guide in order to test if your current Antivirus get rid of the infection. Also to avoid incompatibilities and system problems Do NOT install more than one (1) antivirus program on a single computer
NOTE
Some users are reporting that no matter what antivirus they used, the virus kept running. For those still having issues:
Let’s go to our new Explorer Window. When you try to delete the virus executable file, an error will occur.

Don’t panic, this is normal. As strange as it sounds, we need to take ownership of the file. Right click on the file and select “Properties”

Now on the dialog box that appears:

Now that you own the virus, let’s go back to the beginning

A new (almost identical) window will pop up.

You will not be able to delete the file, but don’t worry. The computer will not be able to run this virus executable file.
Proceed to delete the shortcuts, the Autorun.inf, any .vbs or .exe file, in fact delete everything you don’t recognize as yours.!
Needless to say, be careful, do not delete your legit files.

For example, if your affected drive letter is F then the command should be attrib -h -r -s /s /d F:\*.*
After writing the command hit enter and wait a few seconds while the changes are made.


PS: Don’t worry if my pictures are in Spanish. I’m gonna explain all the steps in English, and the process is much simpler than it looks.
Step One
Windows has the bad habit of hiding certain files and their extensions. This may help novice users to avoid confusing them, but presents serious drawbacks. You may, for example, run a dangerous program called “photo.jpg.exe” because you only saw the “photo.jpg” portion of the name.For that reason, and also to help fighting this memory stick infection, you need to make all files visible. The following steps apply for Windows XP, Vista and 7.
- Click on Start
- Click on Control Panel
- Pick Folder Options
- >Click on “View” tab
- Clear the following check boxes:
- Clear the check box “Hide protected operating system files (Recommended)”
- Clear the check box “Hide extensions for known file types”
Step Two
We need to make sure that your computer is clean from the infection.If a healthy USB memory remains clean after plugging it in, this means your computer is clean and you can jump directly to step three.
If a healthy USB stick gets corrupted after being used on your computer, that a sign that the virus is running on your system and your antivirus is not doing it’s job. Use the update function your Antivirus. If the antivirus still fails to catch the infection even after the update, you definitely need to use another product.
Some users are reporting that their current Antivirus brand was unable to detect and eliminate the infection. I like the products from Avira, Kaspersky and Dr.WEB. The first one offers a Free version, the others offer 30 day trials. But please STOP: Before start uninstalling and installing things, follow this whole guide in order to test if your current Antivirus get rid of the infection. Also to avoid incompatibilities and system problems Do NOT install more than one (1) antivirus program on a single computer
NOTE
Some users are reporting that no matter what antivirus they used, the virus kept running. For those still having issues:
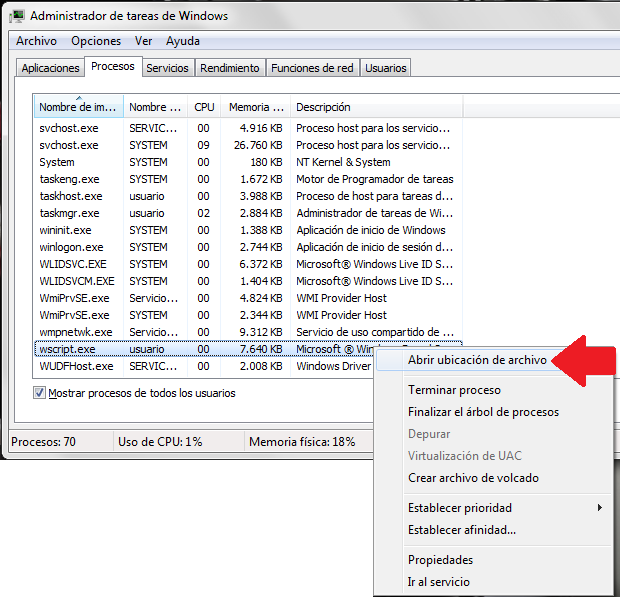
- Open Task Manager (Ctrl+Alt+Del)
- Go to the Processes tab
- Look for WSCRIPT.EXE that is currently running.
Let’s go to our new Explorer Window. When you try to delete the virus executable file, an error will occur.
Don’t panic, this is normal. As strange as it sounds, we need to take ownership of the file. Right click on the file and select “Properties”
Now on the dialog box that appears:
- Pick “Security” and then “Advanced”
- On the new dialogue box, pick “Owner”
- In the example screenshot you will see that the virus changed the Current Owner to “TrustedInstaller”. So, from the list called “Change Owner to:” pick your Administrator name and click OK.
Now that you own the virus, let’s go back to the beginning
- Again, Right click on the virus file
- Pick “Properties”
- and again “Security”.
- But this time, on the dialog that pops-up click on “Edit”
A new (almost identical) window will pop up.
- Click on “SYSTEM” and deny “Read & Execute” and “Read”.
- Repeat the same operation with all the elements of “Group and user Names”
You will not be able to delete the file, but don’t worry. The computer will not be able to run this virus executable file.
Step Three
If step one and two went great, you should be able to see your files again. Unfortunately they are still marked as “hidden” (hence the ghostly look of the icons). We are going to fix that in a moment, but first we are going to delete these crappy shortcuts that were created by the virus and have nothing to do with your real files.Proceed to delete the shortcuts, the Autorun.inf, any .vbs or .exe file, in fact delete everything you don’t recognize as yours.!
Needless to say, be careful, do not delete your legit files.
Step Four (Last one!)
To permanently change the properties of your files and return their appareance back to normal we need to open the Command Prompt.On Windows Vista and 7:- Click on Start
- Type cmd in the first box you see
- Press ENTER
- Click on Start
- Click on Run
- Type cmd
- Press ENTER
For example, if your affected drive letter is F then the command should be attrib -h -r -s /s /d F:\*.*
After writing the command hit enter and wait a few seconds while the changes are made.
Done!
Go back to the file explorer and see if the file attributes are back to normal.
Comments
Post a Comment